Showing posts with label Fancy Folds. Show all posts

Thursday, September 12, 2019

Dino Baby


Today's card is one I made for my nephew's little boy's first birthday.  He loves dinosaurs, andI loved making this card in a box!

The image is from Cute as a Button, coloured with Prismacolor pencils.  The paper is from a pad I bought in Spotlight … it was as cheap as chips and is REALLY heavy, well printed.  Of course, I bought one pad, and I'm not sure they do it any more, sigh
I cut the balloons from snippets of blue and yellow cardstock - I really do keep the smallest bits, they do come in handy for these "little" embellishments - using a die from Paper Smooches, I added some coloured pencil shading and Glossy Accents for that shine and some baker's twine "strings"
The numeral "1" is a wooden one, coloured up with Star Dust Stickles added.  I had to use a heavier weight acetate to hold it up as it was quite heavy, but it still managed to bob around quite nicely :-)
The grass is cut with Lawn Fawn's Grassy Borders die, the banner is cut with (I think) a MFT die, the little flower is a punch and the pearl in the middle was white, I coloured it with a Copic marker to suit.  The Happy Birthday Sentiment is from Elizabeth Crafts, I beliive.  The gold cord and tiny blue dragonfly are from my stash.
I added a jotting panel to the rear of the card, and the piece of patterned paper at the bottom served as a pocket for the gift voucher we gave him
That's it for today.  I would like to enter in the following challenges:
Tuesday Throwdown Pile it On
Give a Crafter a Cookie
Pixies Snippets Playground Use Snippets (balloons)
Cupcake Inspirations Blue and Yellow
Give a Crafter A Cookie Picture to left... bunting and "Happy Birthday"
Send a Smile for Kids Anything Goes for Kids
I'll try and get back soon... I have had my implant done now, accompanied by my normal EXTREME pre-op anxiety... and the meltdown immediately after when the surgeon told me I could not wear my plate for a week until I had the stitches out and he could look at adjusting it to not interfere with the implant.  
I did not set foot out of the house for the entire week, I found the whole thing distressing and am so glad I am on this side of it.  The pain was minimal (unlike the block graft, which was pretty uncomfortable and the swelling and bruising were quite heavy) but the blow to my self-esteem was surprising even to me, I was completely miserable and felt very low.  Ah well, done now, just got to wait for the final stage of healing... it looks good so far... and in 60 - 90 days I can get the crown made and be done once and for all.  At least I've got my magic plastic back in as of yesterday... soooooo glad about that!
Until next time, Happy Crafting, Donna 

Wednesday, January 16, 2019

Happy New... Baby!

Hello everyone... hope you're all settling into 2019, I know I am; it's like the Holidays never happened, lol.
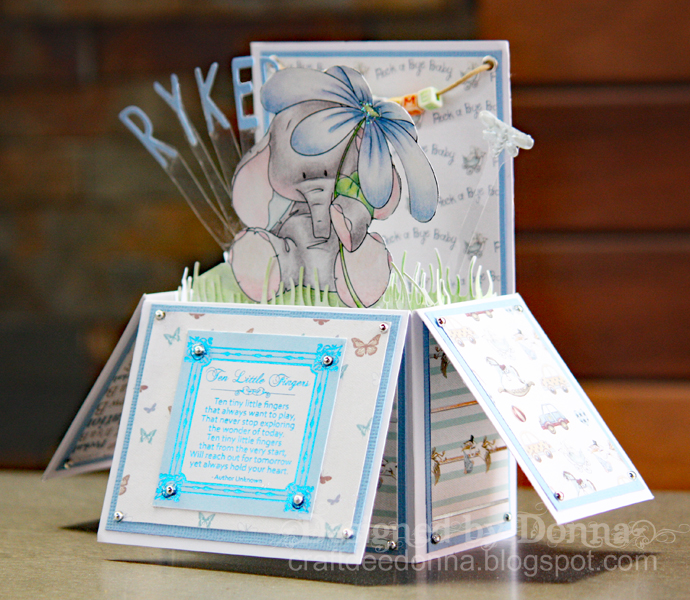
The card I have to share today celebrates a New Beginning too... one of our work colleagues (a scheduler for one of the companies we contract for) had a beautiful bub called Ryker and I made this card in a box to celebrate the event
I love this style of card, they fit flat for posting (and/or...hopefully... storing as a keepsake!) yet provide a "lot" of card for your buck when open.  
I used this gorgeous Lee Holland digi called Elephant with Flower, available here, coloured with Prismacolor pencils... I love the soft pastel effect pencils give for baby images.  There's a little bit of glittery goodness in the flower centre.... just because :-)
I fussy cut the image and mounted it on little grassy mounds made using a Dienamics border die (Grassy Edges, I think)
I cut the letters of Ryker's name from the same blue card used for all the matting (sorry can't remember the die set, think it's Cottage Cutz) and added them to acetate "stalks" at the back of one of the "cross bars", leaving them dancing merrily away behind the image to the left.  On the other side I added a cute little acrylic blue dragonfly to balance it out.
I used multicoloured cube beads to spell out the word Welcome and strung that up on twine on the back upright panel.
The Ten Little Fingers verse on the front flap is from a Kaisercraft 6" pad "Lullaby"
The rest of the papers are just gorgeous in real life... they're from First Edition's It's a Boy pad, there's lots of fine detail and plenty of foil.  I actually used five different patterns of this paper, but that was because I only had a few snippets left of the butterfly pattern, they all go together so well though that it doesn't look like you've run out of one pattern!  It does mean I can enter the challenge at Pixies Snippets Playground, always a bonus :-)
 I added a velcro closer to the bellyband covered that with a rectangular panel and decorated that with a cute laser cut wooden rocking horse.
I added little silver flatbacks to every corner of every panel... which took a surprisingly long time!
As I do with all these cards I put the jotting panel on the back, I added a small panel of patterned paper at the bottom trimmed with some spotty gros grain ribbon from my stash
 .... and THAT's it for Ryker's card.  I'd like to enter in the following challenges
The Paper Shelter and Fab'n'Funky Challenges have New Beginnings
Cuttlebug Mania, Die Cut Divas and Cute Card Thursday have Something New
Crazy 4 Challenges has Favourite Type of Card (shape, theme etc) I LOVE cards in a box
As You Like It,  Through the Craftroom Door, Digi Choosday, Crafty  Creations, Crafting With Friends Challenge #77, Li'l Patch of Crafty Friends, Polkadoodles, A Perfect Time to Craft, Creatalicious Challenges, Crafting With Attitude and Corrosive Challenge All have Anything Goes
Ona personal note, thanks to those who left me best wishes regarding my little friend Rocky... he is still with us; he had surgery last week and came through it really well; we did do an assessment re quality of life with the vet and he scored surprisingly high - a long way off euthenasia being "the" only answer.  Of course it may eventually come to that, but for the time being he is ticking along quite nicely (about which I am very happy and much relieved!) 
Until next time, Happy Crafting, Donna

Tuesday, October 09, 2018

Fore.... Matt, with a Twist

The card I have to share today was for my son Matt's birthday this year - I still have last year's to blog, but this one is "Autumnal", his birthday's in Autumn and I love Autumn, AND it's a fancy fold which I also love so it's today's choice :-)
Matt was going to a schmancy new golf "place" for his birthday - we were all going along... and then, the evening before, he had a very bad reaction to some meds and ended up going to hospital by ambulance.  They kept him in for the night... he got worse (anaphylactic shock) and still looked like an inflatable red M&M when he was discharged the next afternoon... so he didn't go to golf, making this card look like a cruel joke - as I gave it to him anyway, lol
The real "treat" of this card is that it is a Twist and Pop Up card so here's the all-important inside....tada
and a couple of shots of the card in action, as it were
I followed an excellent tutorial (here) that uses metric measurement, yay, so much easier than converting :-)  this is not the first one of these cards I've made, though it is the first I have "blogged", so I know from experience I prefer the metric template :-)
I used a digital Alpha from one of my (many, too many unused, sigh) digital scrapbook kits called "Brick and Metal"... one guess which this is, lol.  
I made the letters BIG and added drop shadows in Word, they don't really show in the pic, but they do make a difference IRL.  I attached them with some bronze eyelets that I also used on the front.  The patterned paper used inside is from the same Kaisercraft pad as that on the outside, the black on blue is flocking, it adds a nice texture
Talking of the front: I just loved the image, it's "Stroke of Genius" from Digi Doodle Shop, (no longer available I fear) I enjoyed colouring him up with Copics and Prismacolor pencils.  I used a kraft card base and added some paper from a Kaisercraft's pad.  The image panel was attached to its mat with some bronze coloured eyelets then propped up on foam tabs.  
I found a flat back that had lots of facets on it, that was exactly the right size for the golf ball... it looks really good IRL. 
That's it for Matt's birthday card, I hope you liked it, I'd like to enter it in the following challenges:
Give a Crafter A Cookie Has "Autumn Colours" and this gorgeous Cookies pic as inspiration  
Crazy 4 Challenges Just wants us to Make a Card
My Time to Craft Has Use Kraft Card
The Paper Shelter Has Let's Celebrate
Crafty Hazelnut's Patterned Paper Challenge Always gets us to Use Patterned Paper
I will be back in a few days with another offering (I have managed to find most of my cards photos all bar two that I can remember, lol - so I have got quite a big Drafts Folder again)  Until then, Happy Crafting, Donna

Friday, September 21, 2018

It's Your 60th... Make a Scene!

The card I have today was a commission... well, one of the ladies I meet up with at the park when I walk the dog asked if I could make a card for her friend Vicki's 60th birthday, so "commission" sounds a bit posh :-)  There were quite a few "elements" of Vicki's life my friend wanted to be incorporated, a scene seemed the most appropriate form... picture heavy LOOOOONG post, sorry;-)
The birthday girl is "not a twig" :-) has bought a campervan to use in her retirement with her hubby, their name is "Read" their kids names are Belinda and Mark - she loves a cocktail (or three, lol) and is a FANATICAL supporter of  "our" Footy team The West Coast Eagles...  whose colours are Blue and Gold. The card was for her friends to sign so it had to have plenty of room for signatures - PHEW, that's a lot of details to squash into one li'l ol' card, lol. It's an easel card, I just love easel cards :-)
There are several images used here; the caravan is the same one I used for my son's birthday card in 2016, which is when this card was made, it's from (the sadly now defunct) The Stamp Fairy and called "Lenny Camping".
I erased Lenny from the front of the van and drew in a drawbar and jockey wheel, as well as adding the spending-kids-inheritance logo on the side of the van and giving the door the appropriate number, one of the reasons I love digis, so easy to mask off and add personalisation :-) I fussy cut the caravan and popped it up on foam dots.
Another little "feature" is the West Coast Eagles flag flying proudly on the back of the caravan.  I downloaded a pic from the WCE Homepage, shrank it down to as small as I could still having it recognisable, wrapped it around a toothpick and glued it in behind the van - of course, it looks so much better IRL
"Vicki", seen here in her cocktail glass is, in fact, Martini Bianca from Dr Digi's House of Stamps... I DID slim her down a little - and fussy cut her & popped her up on foam dots too.  I've added her hubby to the window of the van, he is also from Dr Digi's (Weekend Walter), I've used him for one of my Hubby's cards - bonus here is... he actually looks like Vicki's husband!
I coloured the images with Copics, adding Glossy Accents to the glass and the window of the van.  The grassy hills were cut with Lawn Fawn Stitched Hillsides using some green spotty paper from my stash, I added some shadows to accentuate the layers.  
The "hill" with the pine trees is Poppy Dies Freemont Pine Landscape, the Grassy Border, signpost with "Work" and "Life" on and Picket Fence are all My Favorite Things dies,  the clouds (popped up on foam dots) are Memory Box and the flowers are punches - with gems as centres on the larger and Stickles as centres on the smaller  
I love the arched border... it's MFT as well, "Fanfare Scalloped Border".  I added it in yellow on the blue card (which has a lovely texture called Pebble, and a pearl finish that shifts blue to black that I can't do justice to in photos) that I added the computer generated sentiment panel to... and in blue - though plain blue as the Pebble paper looks nice, but cuts like a dog! - on the jotting panel
As the jotting panel was going to get a lot of signatures it had to be BIG, so I added an "extra" fold and tada... there we have an A4 panel for all to sign - hopefully the pics show what I (obviously!) am having difficulty describing :-)
I added some gems to the Fanfare border on the sentiment panel but left them plain inside so the card stayed pretty flat.
And that, finally, is that!!  I actually REALLY enjoyed creating this card, and the recipient LOVED it, so that was very satisfying too :-)  
I'd like to share it in the following challenges:
Well, that's it for today... this card was one I found on an a camera card.. I'm still trying to resurrect my laptop from the Great OneDrive Fiasco.  I am "getting there", I've found 47 cards from my Drafts- I know I had 52 or 53, so I haven't lost TOO many.  Can't say the same for all my photos sadly, but I am still looking, loading, sorting and labelling so it's not over yet
Until next time, Happy Crafting, Donna
Thursday, August 16, 2018

'Twas the Night Before Christmas

Last month I had a win over at the Little Miss Muffet Challenge Blog and the delightful Kathie asked if I would like to be part of their "Customer Appreciation Day" today... of course I said "Yes please!"


I got to use an image that is brand spanking new, and even though it's called Spooky Park Scene" I thought I could use it for an (always-needed) Christmas card; I just knew it would be perfect for a moonlit scene to go with a line from the Christmas poem 'Twas the Night Before Christmas", I decided to make a pull-tab card so the "Miniature sleigh and eight tiny reindeer" would magically "appear"
I extended the lines of the snowy hills a little and added one to the front.  
I used one of the uber-talented Jennifer McGuire tutorials to learn how to make a Hidden Slider card (here's a link, the card structure starts at about the 4-minute mark - I just used a ruler and scalpel as I don't have the slot dies) and cut hidden bits and the "covering" snow hill out of scraps by hand to make sure it was big enough to conceal the sleigh and reindeer until you pull the tab.
Getting an image with a sleigh and 8 reindeer was, well impossible! I ended up grabbing a free coloured image from the web that had three reindeer and by copying and pasting added the extra reindeer using Photoshop.  Here they are peeking from behind their hill :-)
I used different inks, pigment, dye and alcohol to colour the night sky then flicked watery white acrylic paint on for snow. I coloured the moon with Copics then put a coat of Viva Pearl (Creme) on it and a thin coat of Viva Pearl Ice White.  The stars are Swarovski crystals.  I coloured the rest of the image with Copics, added Jo Sonja Texture Paste to the snow and then heat embossed it with white glitter EP (homemade using Clear EP and fine white glitter)  Of course it ALL looks so much more glittery in real life!
I cut the little Christmas trees from a border die that I've had for SO long, and that I can't remember (and didn't write on the storage box for) the name of... any ideas please let me know :-) that got the coloured with Copic, texture paste snow and glitter treatment.
The snowflake (I don't have the maker of that noted either, sorry) and the holly (Cottage Cutz Winterland Holly) were embossed the glitter and the red Candi centre is from my stash
I stamped the sentiment (from Kaisercraft) on the pull out tab using my fabulous fool-proof Press to Impress stamping platform... and STILL managed to get it crooked!! (I DID stamp it after the card was assembled, so not the platform's fault, lol)
That's about it for my pull-tab card.  This wasn't the first one I've done, but the first one I've blogged... the other will make an appearance from my Drafts Folder one day :-)  In the meantime I'd like to enter this card in the following challenges;

Do pop over to the Little Miss Muffet Challenge Blog and check out the new images on show in their Customer Appreciation Day, I enjoyed being part of it, I'm sure you will too.  Until next time, Happy Crafting, Donna

Sunday, June 17, 2018

Welcome Jett Mark 1

Recently the lovely Di from Pixie's Snippets Playground contacted me to see if I would like to GD for her snippets challenge - which of course I DID, lol - and I thought I'd share a card-in-a-box I made to welcome a friend's baby "Jett"... I made the christening cake for Jett's mum nearly thirty years ago so I like the synergy here :-)  The bonus, from The Playground's point of view is that these cards can (and in this case does) use a LOT of snippets!
I have made a metric version template of this card if you'd like to grab it from my Tutorials, Templates and Other Freebies Page, here's a direct link
The cute image, fussy cut but as one piece, is from Di's Digis... it's called Animal Crew and you can get it here. I coloured Copic markers, with a lot of detail added (like the lion's mane) using Prismacolor pencils. Glossy Accents to the balloon and a die cut sun... from Lawn Fawn's Spring Showers set
The papers I used were snippets from Die Cuts With a View's Animal Crackers pad - it has loads of glitter and, bonus to me, matching chipboard die cuts... these are what I have jiggling around on their acetate stalks.  I didn't realize until I was looking for the name of the pad that I've used this image/paper combo before here  - I obviously like it :-)


The chipboard corners came in the chipboard pack too, the tag with "Jett" on also, the letters for bub's name are wooden ones from my stash.
Like I said there's a lot of snippets on this card, the "frame" around the background (which I actually stencilled clouds onto, though you can hardly see them) IS a frame because I needed a bit more of the dark blue patterned paper to fit one of the outside panels.  I fetched the piece out of the waste basket to make the belly band, can't believe I threw it away tbh, I keep some very small snippets :-)
The little monkey die cut is from that embellie pack too, I have a velcro closure under it to hold the band together
The other side of the outside on these types of cards is where I usually put the jotting panel, as I didn't have a piece of the dark blue card left big enough to make a frame I thought I'd make a pocket to put a tag in instead... that itself is made up of two snippets as I didn't have a big enough piece left of any of the patterns I'd used to do it in one piece :-)  I added a brass eyelet and some baker's twine from my stash and used the plain side to jot my message
That was it for this card, thanks again to Di for asking me to be a Guest in the Playground.  I actually made two cards for this baby, one for my sister and her partner to give... the baby is her partner's daughter's first grandchild - when I did the christening card my sister wasn't his partner... and to make things even MORE interesting, we all met when I went out with him (met through a school friend) when I was 16!!
I'd like to enter this card in the following challenges:
Tuesday Throwdown Tag It - The tag on the front, or the lift-out tag in the back
Cuttlebug Mania, Simon Says Challenge Frame It - The frame behind the image
Fab'n'Funky Challenges Bring me Sunshine
Crafty Cardmakers  For a Man or Boy
As You Like It Favourite Card Base Shape or Fold - I love "different" folds, that add a design element, this is one "favourite" - though I actually make square cards the most!
Die Cut Divas Animals or Pets
I hope you get a chance to join in Di's Snippets challenge... it really is no challenge at all, and a great way to clear out those Bits :-)
Until next time, Happy Crafting, Donna

Monday, January 29, 2018

BBQ in a Box

G'day from WA :-)  The project I have today is a card-in-a-box I made for my son Chris's birthday... in 2015! (Well his birthday IS at the end of November so it's not as dire as it sounds, lol)  We bought him a barbecue as his gift so I thought I'd make a card that went with it
I thought the black and silver was "manly", and the papers I used were, in fact, part of the box of goodies said son bought me for MY birthday - he likes to know what he has chosen is "useful" to me so it gives him a buzz when he sees it "in action".  The black with silver glitter on it is a tissue sort of paper, the snippet of grey and white stripe is flocked and the silver and white on top is foil; all the food groups covered there :-)  The black and white polka dot strip is also paper, though I could just as easily have used ribbon.  The stars (MFT Die-Namics Stacking Stars) on the top are attached to acetate strips, 
I made the whole box from silver card, the decorative strip around the middle is cut using a die.  Of course the real feature of a "card-in-a-box" is what's IN the box... so here it is
Obviously, all the same elements used on the inside as on the outside... plus black leathergrain card. The barbecue is made from that card, the legs are black straws with an eyelet joining them and the wheels are Card Candi I've had in my stash for years.  
The controls on the bbq are silver flat back "pearls" and the red "light" is a hole-less pearl.  I used a jewellery finding (the type that you use to have a multiple string necklace) as a handle for the bbq lid.
Having a son called Chris is handy sometimes... the "Chris" on the right-hand panel was cut from a "Christmas" die, Memory Box I think, the Happy Birthday is an Elizabeth Crafts die and the 31 are Kaisercraft
The lid of the barbie opens too: I wish the plate of MY barbecue was as clean and shiny as it is on THIS one, lol

That's about it for my bbq in a box.  I would like to enter it into the following challenges:
As You Like It: Favourite Die and Why - "Chris", from the "Christmas" die... I love it because I love Christmas, use it a lot ... and the die cuts nicely too :-))
Card Mania Challenges Monochromatic
Crazy 4 Challenges #419 "Opposites" - black and white
Fab'n'Funky Challenges With a Number
Allsorts Challenges Old Favourites - the Christmas die, and those silver "pearls"
I'll be back soon (hopefully) with another offering, quite likely from my drafts... though I have been adding to THAT recently so it may not be an "old" make.  Until then, Happy Crafting, Donna

Saturday, October 07, 2017

Butterflies, Boxes and Back on the Horse

Hello everyone.  Things have finally settled down enough in my "real life" for me to get back, at least in a small way, into my crafting.  I have dragged one of my makes out of my Drafts Folder, it's an "exploding box" card I made for my friend Andrena's 50th birthday, I really like them - she loved it, I hope you like it too.
It is made of quite heavy gold card, the patterned paper is Graphic 45.  I've also used a handmade paper as a mat and there's a ton of embossed velour paper involved too, oh and the trim is ribbon.  
The border on the lid was cut with a die cut, I think it's a Magnolia one... frankly I can't be bothered going to my craft room to check!  It works great as a border of the lid... just bends a bit when you stand it up! 
I used a Memory Box butterfly die cut in gold and trimmed with Swarovski diamantes on the top.  Stripy pink and plain green ribbon from my stash.

You all know how these things work; here's a picture with the lid "off"
The inside butterflies were cut from the Graphic 45 paper and jazzed up with some pearl and iridescent paints before being cut out and stuck to acetate strips to make them "float"  Photos never do these cards justice, it was really lovely in real life, with loads of texture.  The flowers are from my stash, the green ribbon on the inside is SO lush, yum yum. Wooden numerals painted with the same paints and a Happy Birthday die cut from gold (Sissix I think) complete the card
I always find it hard to find a place to write on these box cards... in this instance I made a mini card using some gold card and a scrap of the Graphic 45 paper, embellished it with a border and some bling then stuck it inside the lid of the box; worked really well :-)
That's about it for today's offering.  I hope to be back fairly soon... I do have a LOT in my drafts still, and I have made a few cards in the last year, most of which I photographed though not all :-(
I'd like to enter in the following challenges: 


Fave…Ribbons or Flowers, and Why - loads of flowers here, but I actually prefer ribbon because it's so user-friendly, comes in so many patterns and sits flat - which suits "my" style of card
Border Punches or Border Dies (used a die)
Crafty Cardmakers edit: ineligible... my card/box is entered in more than 15 challenges, whoops. sorry ladies!
Fancy Folds
Die Cuts Only (no image, but yes to sentiment) even my sentiment is die-cut, lol
Autumn - I've used Autumn colours... my favourite!
Anything Goes
#283 Anything but a Card - if you count this as a box!
Anything Goes
Freestyle
Snippets -I've used snippets of card AND ribbon
#Anything Goes opt: Fall - used Autumn colours
Anything but a Square - well it IS square, but not a "square card"... I think that's in the spirit of the challenge
Anything Goes
Anything Goes (Always)

Anything Goes (Always)
Crafting With FriendsCrafting with Friends #52 
Anything Goes (Always)

Use Patterned Paper 
Anything Goes
#123Anything Goes, opt: Leaves
#51 Anything Goes
Anything Goes (Always)


On a personal note: My Dad has gone into permanent care, which is a hard thing for a family to come to as any of you that have done it would know, but we just couldn't keep him safe at home anymore.  It is a lovely place and he is settling as best as we could hope.

I have sold his house (emptying it first!), very stressful in a buyers market when we had a lower limit on what we "needed" to pay the bond for the home; we nearly made it, and have enough to come up with the shortfall.  Not having to pay $1200 a fortnight INTEREST on the bond (which hubby and I have been coming up with) is going to relieve the stress a lot - this is the first fortnight it won't apply, so we'll see :-)
I have managed to keep only six (albeit large-ish) boxes of "stuff" from Mum and Dad to sort and/or store... they bought a Royal Albert Old Country Roses full dinner and tea set each for us, I have emptied one of the display cabinets in my craft room (which is next to our family room) and installed lighting to display it and SOME of the gazillion matching crystal glasses my son eventually wants as his heirloom - it looks really nice, even though it was never my cup of tea, pardon the pun 
Anyway, until next time, Happy Crafting, Donna