Thursday, January 27, 2011

I'm EXCITED

Well, as the title says: I'm EXCITED!!
All That Scraps, one of my absolute favourite places for 'stamp stuff', has chosen little old me as their Guest Designer on their Digi team for February.  I am so flattered, and a little overawed, truth be known! I've never been on a DT before so wish me luck (I may need it!)

This card was made with one of the latest cute little images from CC Designs "Birthday Cupcake", available - of course - at All That Scraps from 28th January.
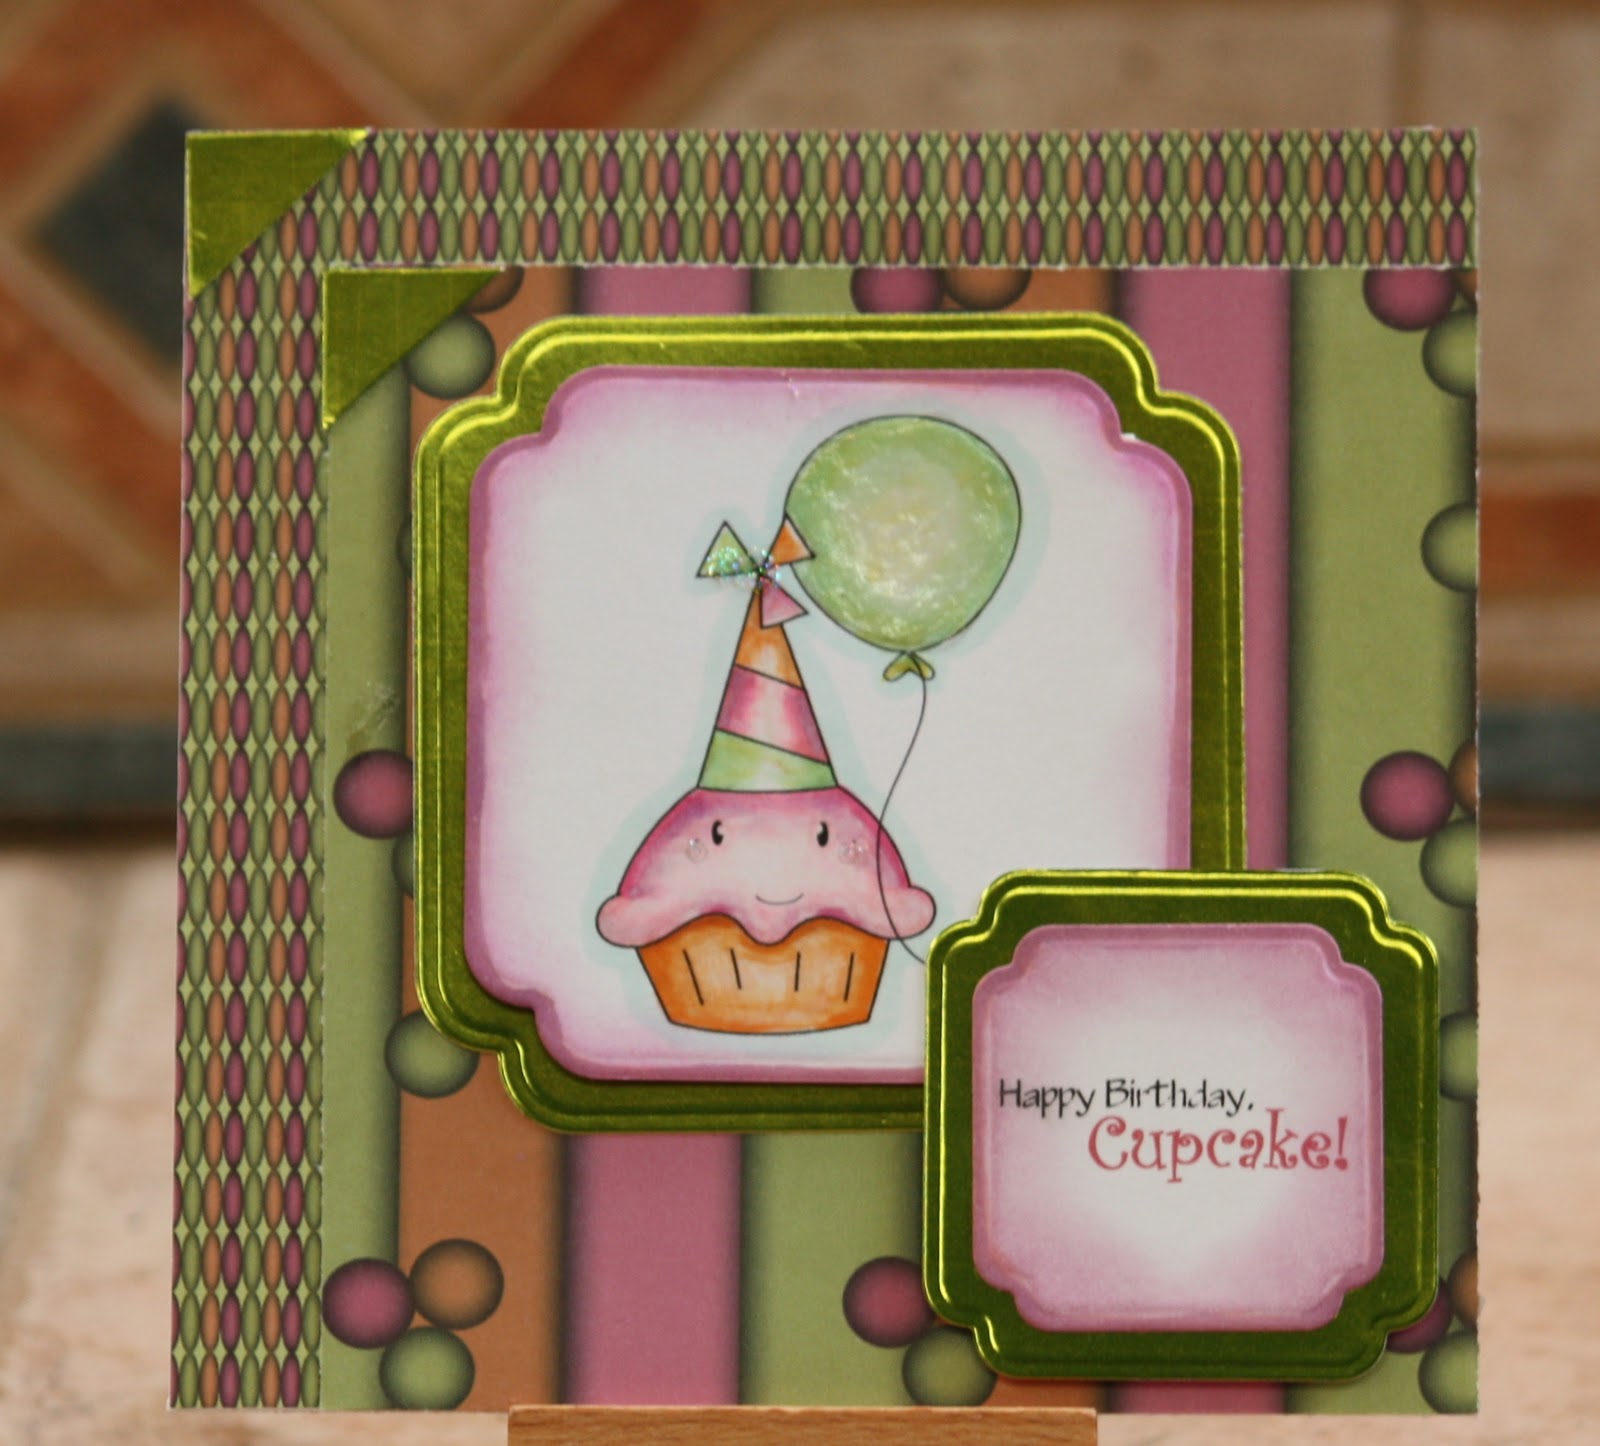
It's such a simple image, I didn't want to overwhelm it with a load of embellishments, so I ended up with a very straightforward card indeed - and I'm happy with it.
I used paper from one of those pads you get at the $2 shop: I love the colours but I've got to say, once you;ve used better quality paper this stuff is so much harder to work with!  The better quality paper is more forgiving if, like me, you get the glue from your ATG all over it.  The cheap paper just rubs away as you try to remove the glue, I had to make the strips inside the card twice so what I saved in dollars I lost in frustration!  Still, I did get that paper right at the beginning of my card making journey (before I knew any better) and as I said I DO love the colours - I just have to be a bit more careful with it!!
I coloured the image with my Copics, I don't have that many pastel ones so I used my clear blender and "picked" colour up from some of my other markers; it worked a treat!
The card behind the image and the sentiment is a lovely metallic green, it shines sort of golden and is very shiny which feels kind of appropriate for this cheery card.  My lovely son Chris got me this from Starfish Lane as a gift, thanks again Chris!
I printed the sentiment on the computer.  Everything is cut and embossed using my Nestabilities Labels 12.  Bizzy Becs has still got her comp on for Aussie Nestie-users, so I'll pop over there later and leave an entry, another reason it's great to be an Aussie!!  
I popped the image up on it's mat and stuck the sentiment flat on to it's one then popped that whole assembly up at the bottom corner but flat on to the image: sounds complicated but you can see what I mean in the photo (you can also see how yummy and shiny the metallic cardstock is!) I added metallic corners to lift that side of the card, glossy accents to the balloon and some Ice Stickles to the cupcake and hat, impossible to see in the photos, of course.
The inside of the card has a couple of strips in it, one straight one punched:  a version of how I pretty much finish the inside of all my cards, oh well, better than leaving them blank I suppose :-) 
There are a few challenges in which I'd like to enter my little cupcake friend:
Creative Inspirations has Celebrate as it's theme this week, Stamp Something has Cute Somethings: this is one cute cupcake! and Fab n Funky Challenges has Use a Digi, no problem there; like I've said before, I'm a digi kind of girl.
Hope you enjoyed looking at my card as much as I enjoyed making it. 
I hope all you Aussies out there had a great Australia Day.  We had a BBQ and Pizzas brekkie (wood fired of course, though in truth the pizza oven wasn't my idea initially, hubby had a win and now I reap the benefit - I LOVE wood fired pizza)
Until next time, Happy Crafting, Dee.

Wednesday, January 26, 2011

Valentine Violet

The name of the image on this card is "Violet with Key", she is one of the lovely Swiss Pixies from CC Designs.  I think of her as Valentine Violet, so that's her name here!! 


Violet is one of the super cute Swiss Pixies from CC Designs, available at ATS: here.  The sentiment inside the card reads "You hold the key to my heart", also available at ATS.  Mine are digis - of course, I'm a digi kind of girl!!  She is coloured with Copics, my new must-have for cardmaking.
Lexis Creations has Valentines as their theme this time around, this is my first Valentines card for this year (only my second one ever).  The theme at All That Scraps Wednesday Challenge for this week was "Early Valentines", Whoopsi Daisy Challenges has Valentines and A Spoon Full of Sugar has love so I'm entering Violet there too .  
I used this sketch from Moving Along with the Times, for their challenge this week - for which you were also to use flowers, I've used one flower, I'm sure that's enough lol.  It's a great sketch, so flexible and enough of the background left showing to make it worth using this absolutely lush paper from Kaisercrafts 12" Love Collection with it's delectable foil hearts and swirls.  
The metal brad in the centre of the flower is really close in style and colour (even though it doesn't look like it in the picture!) to the ones on the black paper.  The other paper is from Kaisercrafts 6" Made With Love collection.
Paper Play Challenges has "Back to Black" as it's theme this time around, so this little black number fits in there nicely!  Stamp Something has "Cute" as it's theme: I think you have to agree, Violet IS cute!!  Do It With Digis has "Pink and Girly", even with the black background this card is certainly pink and girly, lol, and of course I have used my lovely digis, their main requirement. 
The ribbon I used is nice and "light", adding colour without being overwhelming.  I got it as part of the packaging on a candle set I bought in a moment of monetary madness!
I've included a photo of the inside of this card, basically because I've done something a bit different: I always put some of my dp in the inside to tie the card together, but when I do a black or dark card I use an insert so that you can write a personal greeting.  
This time I used my Fiskars Super Sized heart template and cut the heart shape out of a square of the black dp, printing the sentiment on a piece of pink and gluing it behind the heart.  A little distressing around the inside edge of the heart softens it up a bit.
I punched the edge of the pink band (which I used to cover the ribbon I brought round from the front and couldn't tie nicely!) with an EK Success Border punch, Heart and Scrolls.  I used a scrap of the black paper to bring it all together, I'm really happy with the end result.  I hope you enjoyed Visiting Violet - until next time, Happy Crafting, Dee. 

Sunday, January 23, 2011

Bundle of Boy

No, that's not a mistake in the title, it's just a play on words.  The card I did for my niece's baby shower has "Celebrate" on the outside and "your Bundle of Joy" on the inside; I changed the word "Joy" to "Boy" as a little quip, of course my niece knows she is having a boy and I thought it was kinda cute :-)

I used this sketch from Sweet Sketch Wednesday for their challenge this week, and "Blooming Lulabelle"  from Digistamp Boutique (Sweet Sketch wanted to see what we did with our Digistamp Boutique images, if we had one - I have quite a few MORE than one, lol)   I'll be making a card with a baby on for my niece when the baby is born, so I thought this was a great little image for this sort of occasion. 
The mat for the image was cut using Nestabilities scalloped squares, I cut and embossed one side then moved the cut edge to the middle of the nestie before cutting the other side, making a rectangle. Bizzy Becs still has her Nestie competition on for her Aussie customers, so this is another entry there!!
I coloured Lulabelle with Copic markers (the interesting colour of her dress came about because I grabbed a BV colour along with my V's; I'm still "learning" Copics, but don't think there's a "wrong" way to use them, just a "different" way.  The background card is really nice; it looks like watermarked silk - you can just see it in the photo.  
The patterned papers are from Kaisercrafts Utopia collection, I distressed the edge of the mats and the image with Kaisercraft's Sky Blue ink.  
I added two flowers which came from a head of hydrangea that I got in a discount store (with about a zillion flowers on it!) and some leaves cut from scrap using a Martha Stewart punch I got for Christmas.  Two tiny butterflies finish the card off,  cut using another Martha Stewart Punch I got for Christmas (when's Christmas again, me want more!!) and more scrap, coated with Star Dust Stickles.   Flutterby Wednesday has an open theme for this week's challenge, so these little butterflies qualify this card for entry.
The "Celebrate" sentiment is a lovely heavy metal self adhesive plaque I got in a pack as a freebie with some paper I bought over the Internet;  Tuesday Morning Sketches has "Heavy Metal" as it's challenge theme, so my metal plaque, which is like me, heavy for it's size, lol, fits in there.  "Celebrate" is the theme for Creative Inspirations and Delightful Challenge challenges this week, so my card goes in there, Cute Card Thursday has a 1 2 3 challenge: this card has 1 image, 2 flowers and 3 papers.
I hope you like the little "home" I made for Lulabelle, thanks for looking and until next time Happy Crafting, Dee

Thursday, January 20, 2011

Baby Boy Bonanza

Today is the first of three baby boy cards I have to make for babies born in due in the next few weeks.  I also have a card for a baby shower.....but I'm working on something a little bit different for that!
This is for my son's friend Jurgen and his partner, congrats to them on the arrival of Hendrix.
I used paper my other son bought me from Starfish Lane, and Kaisercrafts "Homemade" collection, I coloured the bluebird (which was grey) with my B02 Copic. The image is from Digi Doodle Shop and is called Sleeping Infant.  Next time I use this image for a boy I may remove the bows and flowers.  I coloured the image a little darker than "usual" for  a baby image, and the flowers aren't TOO obvious so I think I got away with it this time.
The lace border is el cheapo paper and Martha Stewarts Garden Trellis border punch, I love it!!  The sentiment is from Kaisercraft, uses Kaisercraft pigment ink and is embossed with clear detail embossing powder.  
I bought the little buttons in Spotlight, I'm building up my collection of this size as I find them the most useful (there's quite a range, so it may take some time to get them all!)  The cute little feet are on a ribbon, that came from my local cake decorating shop - they have a great range: it goes to show there is potential EVERYWHERE!  You can't see much of it - originally I was going to put it where the trellis is at the bottom of the image, but I cut the paper at the top of the card a bit short!!  I like how this turned out anyway.
I'm entering this card in quite a few challenges:
I used this sketch from Sketch and Stash and used new paper and a new image.  Simon Says Stamp has Bingo happening this week, I used the "Punch/Embossing/Ribbon" line.  Bizzy Becs has "3 Flowers, 2 Buttons an 1 Ribbon" - now, not much ribbon shows, but it IS there, lol.  Stampin' for the Weekend has New and Blue, and Cute Card Thursday and Creative Craft Challenges have monochrome. Pollycraft has pastel colours, One Stop Craft Challenge has a Card for a Male (yes, baby boys ARE male!!) and Die Cut Dreams has use a digi and a rubber stamp; the main image is a digi and the sentiment is rubber (well, clear, nearly rubber) I hope that's enough to qualify. I'd better make sure I actually enter the challenges this time, last week I posted my Mermaid Tissue Boxand promptly forgot to enter half the challenges!  I AM getting old!
Thanks for looking at my card, there'll be more in the next day or so as I have a few well underway.  Until next time, Happy Crafting, Dee.

Wednesday, January 12, 2011

Mermaid Tissue Box

Good morning, or afternoon etc, Today's offering is this tissue box:
"Make a Tissue Box Cover" was the theme over at the All That Scraps challenge blog this week: It was a bit of a challenge because I'd never made one before, but only a bit because they had a link to an easy-peasy tutorial from Split Coast Stampers - which I've taken the liberty of copying here.  I had to "metricate" it as I don't even possess a ruler with inches on it, and am completely amazed at those of you who can work with 9/16" etc!!!  Give me multiples of ten any time, lol.
All this fabulous paper came as part of my Christmas present from my son, he got it in Starfish Lane in North Perth; the lovely ladies there have the BEST range - but I leave Chris choose for me in the interest of NOT spending my entire life there choosing for myself!  He has good taste anyway, and it means I don't always get the same kind of stuff - you know how it goes!
One of the mermaids has pink hair and a purple tail, so my mermaid has the same, her name is Treasure Tempestwind  and she is one of the Sweet November stamps I got as a digi  from All That Scraps, they do come in rubber too - of course!  Treasure and her little seal friend are coloured with Copics  It is hard to see in the photos, but the turquoise and purple paper are both flocked, they feel lovely!!  The purple has a pattern in it and the turquoise has a sort of nap that makes it look (to me at least) like light playing on water.
I used some of my new Nesties (again for Christmas), the outer circle is "Lacey Circles" and the inner is just plain Circles.  I embossed the edge of the plain circle then ran my RV17 Copic around the very edge - it helped tie the colours in without interfering with the image.  Usually I would ink the edge in for 1cm or so - that's 1/2" for you old fashioned types :-) but this line gave a cleaner and somehow more appropriate look.
I used Fiskars Apron Lace border punch on the edge of the turquoise paper on the lid and on both sides of the purple strip around the middle of the box, I'm really pleased how well it goes with the Lacey Circles.  The top of the box has an opening (for the tissues, of course) cut from Nestabilities Labels Four - still one of my faves.  I framed it using the purple paper, amazing how "unfinished" it looked without it.
Sweet Stampin' has "try something different" as it's challenge theme this week  and Cupcake Craft Challenges has "something new" (all that new stash and a new technique!) so I'll be entering there; Stamp Challenges has "use a digi" - my favourite challenge, and Oldie But a Goodie has "bright and cheerful" - which I think this project definitely is! Bizzy Becs still has her competition (for Aussie customers only, sorry) running which involves using a Nestabilities die, never a problem.  Great comp, go have a squizz ("look" for you foreigners!)
Thanks for looking at my little tissue box: off you go and try it for yourself, you'll be amazed how simple it is!  Until next time - Happy Crafting, Dee

Tuesday, January 11, 2011

Hi Ho, Hi Ho, It's Back to Work We Go

As the title suggests, it's back to work for us today.  It has been a nice break, though having spent much of the time redecorating, that is probably not the right term!  We will file it under the "a change is as good as a holiday" category ;-)  As I haven't had a chance to finish any papercraft projects recently, I have a few baby/baby shower cards coming up very soon,  I thought I'd post some pics of items I have painted  as "baby" gifts -usually for my sons' friends.

This cute little group (called "Bear Hugs") was painted on a wooden box, I usually do boxes as they are practical as well as decorative.  I used a pattern by Debbie Cole, in her book " Heaven Sent Acrylics".  The paints, also as usual, are Jo Sonja.  


Heres a "quick pic" of the side of the box.


"Bear Hugs" was for my son's friends first daughter, I did another teddy box for their second - here it is:
The pattern for this little cutie is from the Ultra-talented Donna Gilbertson (fellow Australian), I found it in Australian Folk Art and Decorative Painting Vol 12 # 2.  Originally it was an Easter image, I just changed the contents of the basket from eggs to flowers.
I have painted quite a few things using Donna's wonderful patterns, they just "speak" to me, lol.  Check out her website here, I think you'll see what I mean!
I put pansies on the side to match her dress, originally they were much smaller, but I made a mistake on the fourth (of four, of course) "side".  Being a bentwood box, it just wouldn't wipe off, soooo -BIG pansies!!  They still looked alright, otherwise I wouldn't have given it to them :-)
"Little Ronnie" is offering #3.  The pattern for this darling little boy on his cute tricycle came from a book my sister gave me for Christmas a few years ago: "The Cat''s Pajamas"  by Wendy Scott.   I find with painting, as with papercraft, that boy-images are hard to find, so I was really happy to find this one.
I made the frame using my trusty jig saw and router.  It is made of MDF, but painted and distressed to look like aged wood (so much more affordable and available, lol)
The technique use just washes, so I used tiny amounts of paint.  As you have to build layers slowly, the hardest part of this painting is being patient - NOT my strong suit, but as I love the effect I do persevere and "wash" quite often! 
Last, but not least, for today is this box, which I made for another of my son and daughter in laws' friends.  Actually this lovely young couple are one of the ones that I am working on a current baby project for (their second child is due in about three weeks).  They are also the couple that I did this card for.

 "A Proper Victorian Bunny" came from quite an old book by Jean Myers called Cherry Jubilee.  I got it (in excellent condition) from a second hand book shop when I first started painting and wasn't sure if I would use books: I now have over 170 books - I KNOW, enough already!!!! But I do use them, and they don't eat anything :-)  They do however take up space, my studio is pretty full now with the paraphernalia of various craft pursuits.  Like I say in my blog header, I AM a serial crafter!!!
Anyway, enough waffle for one day I hear you say.  I promise I will have a (smaller) post very soon, I'm working on stuff for a few great challenges that are up and about again.  Thanks for visiting and until next time, Happy Crafting, Dee.


Monday, January 03, 2011

Bye Bye 2010

First of all: HAPPY NEW YEAR!!!  I hope it is a happy and safe one, bringing all that you wish for.  I thought I'd make this post the last one about Christmas 2010.  These are some more of the simple cards I made.
This card uses Candy Cane Cherrie, available at Tickled Pink Stamps.  I used her on another couple of cards this year, here is one of them.  I coloured Cherrie to match the mat behind the image which was from Kaisercrafts 6x6 pad "Carnival Christmas".  I cut and embossed the mat using my Spellbinders Nestabilities Scalloped Oval, I use this a lot!  The image was cut and embossed using my Classic Oval Nestie, which I also use a lot!!  
Bizzy Becs has a competition for her Australian customers to win a Spellbinders Grand Calibur machine, all you have to do is make a card using a Spellbinders die - which is absolutely no hardship, I love mine and I got THREE new ones for Christmas which I can't wait to crack out- and you can enter as many times as you like "earning" a token (entry) each time, or buy a Spellbinders Die (which are on special what's more) earning three tokens per order.  Pop over to her site and check it out.
I didn't "fussy cut" the image as I normally like to do: I was running out of time!  I just foam dotted the matted  image instead.  The strip on the left of the card is ribbon,  I inked the edge of the card to soften the effect.  This really was a simple card to do, as was this next one.
For this card I used a tag from Graphic 45's "Christmas Past" collection.  I embossed some gold board with Cuttlebug's Divine Swirls embossing folder, then mounted the tag on it then cut it out leaving a narrow border.  I used tartan ribbon from my stash in the punched hole which I had meant to put an eyelet around then remembered I don't have an eyelet setter, lol.  
The papers are from Kaisercraft's 'Tis the Season and Dear Santa 6x6 collection, the band in the middle is ribbon from my stash.
I used papers from the same pads for the card pictured below,last year. All I added to this card, which came with the scalloped edge, was some gold stickers.
 I've got to say these pads have been an absolute bargain, I reckon I've still got years of cards left in them (especially if I maintain the same efficiency as I did in 2010 and resort to "shop" cards  because I run out of time), lol.  

The other two cards below, using a different type of window card than I used here, are even MORE simple, if that is possible!!
The "Joy" card has a panel of green embossed with Cuttlebug's Snowflakes embossing folder, how different it looks in green!  The Joy is a pre-made 3D sticker I got in a pack from a $2 shop, some of them weren't bad! The only other decoration on the card is some flat backed pearls from my stash.  
The inking around the edge is a bit heavy - you know how it goes, I was in such a hurry to get these last few cards finished, I got a thumbprint on the card then had to spend five extra minutes trying to build the ink up to cover the thumbprint: The old adage "haste makes waste" at work here, methinks! 
The last card has some offcuts in the small cut outs and filling in the edges of the window. The sentiment is a sticker and the border is a multicolour braid/cord/ribbon that I bought for something else, but found fitted this card perfectly - and again SO easily ;-)
Anyway, that's my offering for today.  We've nearly finished our decorating but my darling hubby is home for another week so my crafting time is somewhat curtailed as we rush about "having" a holiday - something of a contradiction in terms, sometimes isn't it!  Until next time, Happy Crafting (do some for me!!) Dee